Saturday, August 30, 2008

Imagination at Work

My 'real life friend' and fellow blogger introduced me to one of his unique online finds.
Polyvore.com.
At first I just thought, another thing to worry and obsess about and didn't give it too much thought.
I then watched him create and create and said ok now I have to give it a try.... after all, it doesn't seem too much different than scrapbooking - just have to use your imagination.
The end results are quite a few unique to me, "Sets" or you can even call them layouts, why not?
Here are the few I have done.... hope you like them!

These are the things I love....

This is my weight loss journey...


This is everything my son loves...

This is my scrapbook bulletin board!


Thursday, August 28, 2008

Sketch Challenge: 2 pictures

Yes... I gave in and participated in another myspace sketch challenge.

This challenge required 2 pictures.
Original sketch provided by Larissa:


My version:


I used a bright green with dark green polka dots 12x12 paper as my background. A different shade of the same paper was used for the paper edge up top as well as the mats for my pictures. I made the journal circle on my own in MS Word. I have journaling stamps but the circle one is not that big and I wanted one to pop out. I used my Cats Eye inks to give it some color. The stars I made on my Cricut using my Celebrations cartridge and jazzed them up with Stickles and placed them on the layout with some foam adhesive to give it dimension. I did the same with the chipboard title.


I hope you like it!


Photobucket

Sunday, August 24, 2008

Sketch Challenge: 4 Pictures

Since my 1st sketch challenge came our fairly well, I thought I'd give another one a try. This time my myspace scrap friend, Angela hosted this challenge.


This was the original sketch:


This was my version of it:


I had decided to use pictures from our recent trip to The Bronx Zoo. I used for the first time in this layout, Stickles glitter glue. I have seen others use it and have been very anxious to get my hand on some so I recently got about 6 different colors. As you can see I outlined the leaf stickers as well as some of the leaves that are on the patterned paper. I also outlined all the pictures on the mats.


I was excited to finally get to use the Jolee's Zebra and Giraffe stickers that I had - I think they are the cutest!

Photobucket

Saturday, August 23, 2008

My 1st Sketch Challenge: 3 Pictures

I am part a handful, well maybe 2 handfuls of scrapbooking groups on myspace and I have to say I have befriended many great women.

One of my scrap-friends, Denise, posted a sketch challenge. She sketched out a layout and challenged the group to put together a similar layout.

This is Denise's sketch:


I have known about this challenge for about 2 weeks now, and it is due month's end and I hadn't given much thought about it until tonight. I just sat at my scrapping area (my dinning room table!) and it just came to me. What is the most prized possession that my son has at this moment? All of his cars.... but his 'own' car tops his list.


This is my version of the sketch:

I think it came out fairly well. I have a lot of car themed embellishments (brads & stickers) because I know I will use them pretty often. I was even lucky enough to find a journal tag with a car on it from my K&Company Tag Pad and attached it to the layout with a red car brad.

Thanks Denise! I can't wait for the next one!

Photobucket

Friday, August 22, 2008

I Made it!

Step 1 - get crafty a
Step 2 - start scrapbooking a
Step 3 - start making invitations!!!! aa


I am very very proud of myself for attempting home-made invitations this year for my son's 3rd Birthday Party. I wanted to do something different and wow everyone.


I started just with an idea and had no idea if and how I would implement it.


The Theme: Cowboy/Western


I started with the supplies (all purchased at Michaels):

  • white/blank cards with envelopes
  • vellum paper
  • 3 kinds of patterned paper
  • Jolee's stickers
  • Brads
  • glue stick
  • glue dots
  • ColorBox Cat's Eye Ink
I sat there looking at the white cards and said to myself "how am I am going to 'un-whiten' them".


I took a piece of the bandanna print patterned paper and cut it down to size and glued it to the inside of the card (cover all the white space). So far so good...


I then took the tanned cowboy print patterned paper and did the same to the front of the card.


I printed the invitation information onto the vellum paper using MS Word and added a cowboy silhouette clip art. I cut the vellum down to size (I was able to print 2 invitations on 1 piece of 8.5" x11" vellum paper) and attached it to the inside of the card using 2 western themed brads (lucky find on eBay!) on the top 2 corners.


The inside verse was:
Howdy Partner!
I'm asking you
to saddle up
and come chow down!
Thomas' 3rd Birthday Party
Date
Time
RSVP


Here is a closer look at the brads - aren't they the coolest?

Back to the front....

I used another color of the bandanna patterned paper and cut out "You're Invited" on my Cricut using the Beyond Birthdays cartridge. I attached the cut out using Glue Dots to the center of the front.

I used decorative scissors and cut the bottom edge of the front of the card to give the illusion that the card was ripped or even burned. I used my ColorBox Cat's Eye ink and distressed all the edges in a dark brown to give it the burned/antiqued look. Looked PERFECT!!!

To add the final touch to the front, I placed Jolee's cowboy themed stickers to the front. The package can with a few different stickers, so I was able to have 4 variations of the front.

The final product:


These are the 4 variations of the front: the inside:

I am so proud of how these came out and was so happy to send them out to everyone. I received tons of compliments and the "you should start your own invitation making business" suggestion but I don't know about that :)

I then made my own return labels and stamped the front of the envelope with a horse stamp that I was lucky to find on sale at A.C. Moore.

The party came and went and it was a success.

Photobucket

Thursday, August 21, 2008

My 1st Scrap-Lift


I am not one to literally copy something that someone does. Try to get ideas, yes, but copy no. I have come to learn that 'scrap lifting' is something that is usually welcomed in the scrapbooking community.


I subscribe to the magazine Scrapbooks Etc. and they had a layout with a sketch and templates for it, basically inviting you to scrap lift.


This was the article in the magazine:


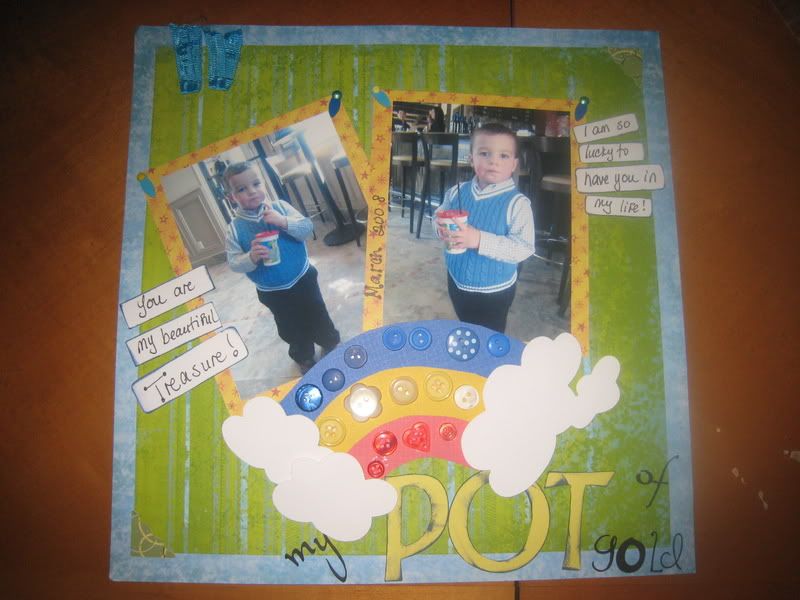
And this was my version of the layout:

I started with a 12x12 sheet of blue paper, and cut down a green sheet of 12x12 for a pop of color. I added corner embellies to the green paper for a little extra touch. I matted my pictures with a bright yellow card stock from one of my "Designer Matt Pads" by K&Company and added anchors and brads to the top corners.

I didn't use the exact colors of the original - I wanted to make it my own.

I liked the idea of the little white tags to add the journaling, so I grabbed that idea right away!

I used my Cricut to cut out the clouds and title "My Pot of Gold". I also ink'd the edges of the title and white tags.


I like the idea of adding the colored buttons to the clouds but for some reason my version doesn't have that scattered look like the original does.

I hope to do more scrap lifting soon!
Photobucket

Layouts in 2007

I started scrappin' in the Spring of 2007 and I think I did plenty layouts in about 6 months.


All of these layouts are part of my son's "1st Year" album.

Now keep in mind, I was a beginner :) I already posted my 1sts.... these are the rest:


The layouts without matts behind the photos are ones I did earlier, not knowing matting brings out the photo :)


*These are not necessarily the order I did them*


my 1st attempt at journaling:


I tried using stencils on this one... that was the last time I ever used them!


I love this one... my friend Joey cut out the watermelon for me!


These are 2 Valentine layouts and the 2nd one is not a favorite at all... has to be one of my worse


You can see that at this point they are starting to improve a bit.

I love how this one came out.... one of my best that early on (at least I think)


This pool layout was my time ever using my Cricut!

Sorry for the photo dump.... but now I will be able to show you my 2008 layouts in more detail!


Thanks for lookin'!

Photobucket